Sunday, 23 May 2010

52 Weeks: Week 3 - Fabric Fusing

OK - this week is fabric fusing, a wide-open area that concerns joining fabric together and marking it using heat. A soldering iron to be precise. I've never tried it before but I read a book on Thursday so it's allll good.

This week is not getting off to the best start. For starters I'd already written the first para of this then Jay used the PC for some sheet music software and it vanished. LJ usually autosaves (I write these in my personal journal initially on LiveJournal - for those of you who are reading from elsewhere) - it hadn't. I'd selected the lot and hit ctrl+C - had it copied? Had it fuck.

Anyway.... what I had written was how this week was off to a less than auspicious start. I thought I had plenty or organza - I was wrong, and organza is the fabric all the lit states is best for starting with. Also it's sheer which for an awful lot of this technique is essential. Nonetheless I've hunted out what I have - mainly scraps - raided the jewellery drawers for leftover organza jewellery pouches, raided the ribbon drawer for organza ribbon and checked  upstairs for chiffony scarves (no joy - I suspect they're packed up in black bags-for-carbooting and stored at my sister's). Tomorrow, I may start looking at clothing I rarely wear in a whole new light... NO, I already packed everything that I didn't like / didn't fit into black bags and dumped them at my sister's. There may be some voile curtains upstairs... and I'm sure there's a small chiffon tablecloth around somewhere as well...

That's what I had written. And what I was coming back to write is that my effing fabric scissors have vanished off the face of the earth which is unfortunate. I have other scissors, obviously, but the fabric ones are REALLY, sharp and good for erm... fabric. I had a relatively new pair of paper & card scissors that would have done the job prior to last week when I was using them to hack sheets of plastic. I rather suspect they're a bit blunter now.

This is why I can't find anything - studio mess!


Anyway... I have amassed large quantities of small pieces of organza, large quantities of larger pieces of non-sheer but definitely fusable fabric and lace & netting stuff, some felt for backing, a bunch of templates (I'm really regretting letting Geoff throw away the zillions of leftover sheets-with-interesting-holes in where he's popped out game pieces from their card sheets in the past). My soldering iron is at the ready, the window is open, and my peculiar-looking but essential anti-poison mask awaits.


Flattering, huh?


I have no idea if if will help with plastic fumes, it was bought to protect against breathing spray-on glue and spray paint. And the final essential - a large ceramic tile. The books suggest glass which I personally feel is a recipe for disaster. Ceramic will work just as well as a surface for working with heat and has the added advantage that the edges are unlikely to shred my fingers. For those of you who visit often enough to recognise it, yes it is the type of tile on my kitchen floor and no, I didn't excavate one an inconspicuous place. Although I may have considered it were there not spares in a cupboard.


Tools & materials & stuffs


The rest of my 'evening' (OK, it's 4am but you know what I mean) is going to be engaged with the boring but essential task of making lots of usable sized pieces..

...and at 6am I have finished cutting bits of fabric up. I know, I know, the main event is taking a little while with this one.

Given that I did not, in fact, have the relevant amounts of organza I am largely going to ignore the hand-holding that goes with following craft books. I'm also going to play with small panels rather than big ones coz I don't have the fabric for large....

OK turns out I do have a bunch of voile curtains sitting unused for the last 3 years. I've nicked two (I have more but only two colours).


Initial tests with soldering iron - my first time!


Initial experiments taught me two things. a) Pastels are not my friend in this medium. b) I need to sharpen my soldering iron tip to a finer tool.

And sadly the rest of my Saturday were taken up with real work, Finn's birthday party and - arghh! - being ill and sleeping and now, at 4.30 on Sunday morning the sickness is not feeling any better. I feel fairly crappy although my temperature is now back within the realms of normal which is an improvement.

So.. Sunday 2pm. Sunday I have produced something that I like - see:


My first real fabric fusing piece


It's done by fusing layers of fabric and then cutting pieces away from the top - see?

How I did it


What do you see? I know what I see (and Darren got it instantly in a that's-obvious voice. Geoff took a bit of squinting but again got it more or less right with a bit of prompting). It's currently entirely fused-with-a-soldering-iron fabric pieces with a bit of purely ornamental hand stitching. I am considering adding machine stitching for definition although I may save that technique test for another project and leave this one as is....

...OK, I did opt for adding machine stitching and am pleased I did. I like the finished effect. And that's it for this week coz I'm out of time. There's a LOT more with this I'd like to try and at some point in the near future will try and put aside some play time. It was fairly time intensive, plus I've been ill and busy doing real stuff this weekend but for a first effort I'm pleased with what I produced. It doesn't photograph well, fabric too shiny and sparkly.


Machine stitched and finished - about 8 by 8 inches


Next week is an even vaguer topic in that it's 'do something with acrylic medium'. Which could be anything really, haven't decided yet. Mainly I just want to know how it behaves as I've never touched the stuff.

Monday, 17 May 2010

52 Weeks: Week 2 - Friendly Plastic

So... what is friendly plastic?

It's a craft-specific material that comes in plastic strips (and pellets but I'm not using them at the minute) which is malleable when heated. It comes in a wide range of metallic and foiled finishes. See the picture below.

Friendly Plastic & tools.


Having spent a couple of hours getting a feel for the material and heat required I needed more. Specifically, its a product I don't have any literature on, anywhere. After a couple of hours I also came to the conclusion that this particular material would benefit greatly from the use of some bezel settings although sadly I don't have any.

Early Efforts


Early efforts kinda look like a 5 year old has went mental with modelling clay and metallic paint. So some refining neccessary...

Completed componants


I did a fair amount more. It's not growing on me particularly. It's kinda like a very limited version of polymer clay (which is all kinds of awesome). Sure it has a speed advantage - poly clay needs to be over baked - but while polymer clay is incredibly versatile, friendly plastic just isn't. You're stuck with the colours it comes in, EVERYTHING sticks to it when it's hot and needs coating in oil to prevent this - which also means after it needs washing in soapy water, it's thinness means making items with embedded components (like loops to form drops or pendants) isn't terribly practical - you'd need to double up sticks and relatively speaking that works out rather costly.

Textured and made into a brooch


Also you can texture it - it does take textures nicely, subject to coating everything with oil - but the minute you need to heat it up again (I've found that late heating for re-cutting and for adding a backpiece are both frequently neccessary) you lose the bloody texture. Silicone stamps / texture plates work well, plastic ones do not - even with the oil as a release agent they stick.

What can I say about it that's nice...? The colours are cool and it makes nice brooches and it IS pretty fast to work with. I might have found it more palatable if I had some bezel settings which I suspect would work very well with it.

Finished Jewellery - Other Brooches


Ring


Pendants & Necklace


Either way, it's reasonably well suited to jewellery and so jewellery is what I turned the shiny bits into and I think my main problem is that Friendly Plastic is, well, plastic. It feels cheap and from the back, at least, looks cheap. Polymer clay is plastic as well but doesn't have that cheap & nasty feel to it (and poly clay can imitate just about any material that isn't transparent).

Cheap-looking back


While I've made these bits into jewellery, I actually see me having more use for it incorporating bits into mixed media artwork which among other things, firmly hides the back (as would the bezel settings I wished for earlier).

So all in all this week was disappointing. Next week... fabric fusing. Largely a mixed media art experiment although I'm curious about the necklace / bracelet making potential as well.

Sunday, 9 May 2010

52 Weeks: Week 1 - Wax Landscapes Part3

OK... better day today. Somewhere along the line I improved a couple of earlier ones (or at least modified them!) so I'll start with them.

IMPROVED 1


I mentioned to someone that I thought this might look better with little flowers added. And figured I didn't have anything to lose. It does look better. Not brilliant, but better than it did.

IMPROVED 2


This was my first attempt at castles. Due to the nature of the medium, they're more suggestive. Not especially happy with them but needed to try.

Now... onto the actual attempts

Attempt 11


Attempt 11 - Another castle attempt while playing with textures and marks. I'm... undecided on this one. Done on the hotplate with a silicone rubber tipped thingy. Thats a technical term.

ATTEMPT 12


Attempt 12 - heh, I like this. Crystaline cave. The 'crystals' were done by dabbing a brayer on (little mini rubber roller), waterfall done with tissue and sponge.

ATTEMPT 13


Attempt 13 - I quite like this as well. Sky could be more variegated but I like the slightly surrealistic colour. Part iron, part sponge.

ATTEMPT 14


Attempt 14 - this I like although the background could do with softening. It looks better 'in the flesh'. Done with iron, stylus, tissue and hotplate

ATTEMPT 15


Attempt 15 - my final one before calling it quits on week 1. and I do like this. Sea, sky and island all done with hotplate and tissue, foreground done with the iron.

So... the objective was to improve my wax landscape technique and I did. In about 10 hours total over 3 sessions. Objective was also to explore techniques I shy away from usually and there's a fair amount of iron and stylus work there both of which aren't my usual MO. And there was some new techniques in there - stamping with my brayer and working with tissue are both things I haven't tried before.

Just to finish up I played around with abstract texture and depth.


TEXTURE 1


Texture 1 - This was done entirely with cotton buds. Yes the thing you clean your ears with. Then iron-blotted with tissue afterwards.

TEXTURE 2


And this was done but putting my wax card down onto the hotplate on it, drawing melty wax strips on it then dragging a wiggly poly clay cutter down and up and left and right. Then blasting it with a hot air gun. To see what happened.

It's been interesting and rather fun :) Next week is Friendly Plastic, something I've never used before.

Saturday, 8 May 2010

52 Weeks: Week 1 - Wax Landscapes Part2

OK... well I'm slightly disabled this morning with stressy everyone and hordes of children wandering into my office (where my studio is).

ATTEMPT 6


But Attempt 6 went ahead nonetheless and reminded me of two things. 1. The first picture of a session is ALWAYS crap. 2. I hate using metallics for anything other than detail & highlight work. Don't try and paint hills and skies in them.

ATTEMPT 7


Attempt 7 - at this point I figured it would hurt too much to have a little hotplate help.

I also came to the conclusion that I find it REALLY difficult to do anythingwith constant interruptions, noisy kids, and stressy husband. So after a little play on the hotplate, I'll end part 2 and try again in the middle of the night when there's no-one around to bug me.

So attempt 7 anyway. I'd switched to the hotplate because I was frustrated putting the sky down with an iron. Hotplate and tissue got the colour mix I wanted but it did kinda go downhill from there once back on the iron. Just... messy and not very good.

ATTEMPT 8


Attempt 8 was a deliberate hotplate abstract. Quite often abstracts can suggest landscapey type scenes so it was a case of putting the wax down, crossing my fingers and plodging my card in. I quite liked what I got and added ironwork around the edges. I see the view from inside a cave, looking out at the reflection in a lake of a forest burning. You may see whatever you see fit.

ATTEMPT 9


ATTEMPT 9 Upsidedown


Attempt 9 was literally cleaning up the wax on my hotplate fro the previous. I haven't decided which way up it goes. There's either a sky or a river depending on the orientation. Its not great but it WAS just cleaning up wax.

ATTEMPT 10


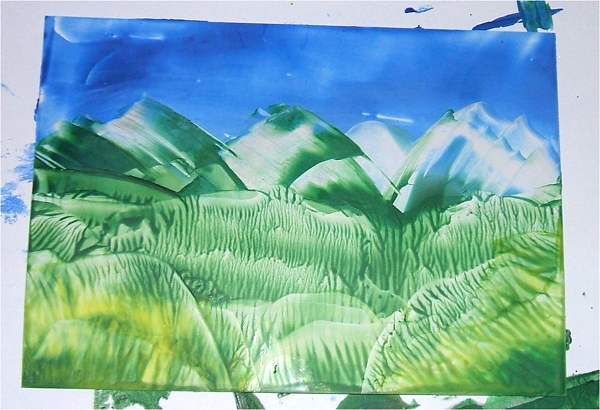
Finally attempt 10. hotplate & tissue sky, ironed hills and foliage. Kinda makes me think of the beginning of spring in the Swiss alps. Why Swiss... dunno it makes me think of cowbells and shepherdess girls in traditional dress. But fails to impress, hence coming to the decision that this is perhaps better done without distractions. Or at least when I'm in a marginally better mood.

52 Weeks: Week 1 - Wax Landscapes Part 1

Part 1. Of probably 3 :) I was writing as I went and figured it was going to be best to break it down.

Soo... week 1 - wax landscapes

As I've said, I'm appallingly bad at wax landscaping. This frustrates me. So I'm starting off my little project with tackling them. There's a number of issues I have with it, and first amongst them is that I find encaustic irons incredibly clunky to work with. I'm a jeweller, I'm used to manipulating tiny things with microprecision. Painting with an iron is like... trying to do wirework with a mechanics toolkit. Clunky and awkward.

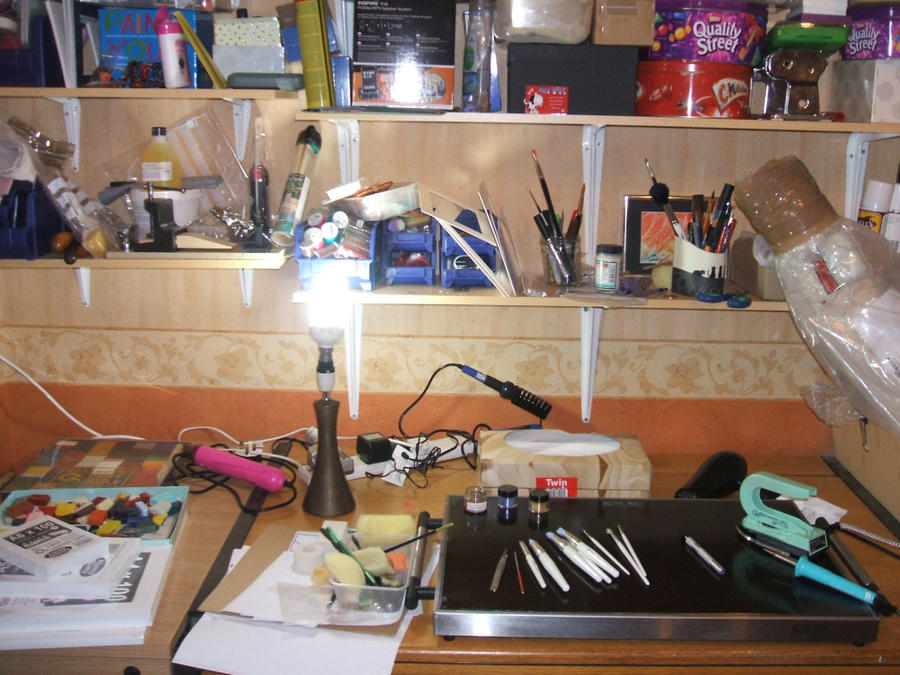
And for interested parties, this is my studio setup. Theres some info on the details under the picture (if you click through it) :)


Wax Studio Setup

More pictures of my setup for wax in my Scrapbook

So why not just leave it...? Because I know what CAN be done with that damn iron and I'm not going to be foiled by a flat block of hot steel. Not yet anyway. If you want to take a look at the possibilities, take a look - HERE

So I started out with a supply of A6 cards for practise. Looks like I'm gonna need them...

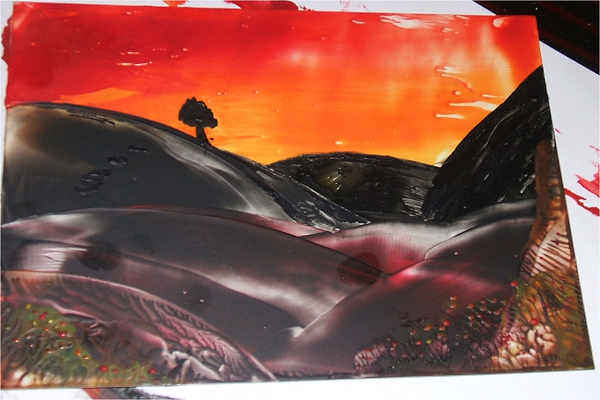
ATTEMPT 1


Firstly, ignore the fingerprints. Encaustic art needs polishing after making at which point they go :) and I haven't done it yet as this is essentially a WIP post.
Attempt one convinced me to never use black wax in this way. It just gets in the way and makes it difficult to work over the top (most of my waxes are transparent). And while every encaustic book on the planet waxes lyrical (excuse the pun) about how easy it is to do-over a picture you don't like - what IS near impossible is to do over PARTS pf a picture. So I like my sky and my foreground foliage but hate my hills. Tough, either get rid of the lot or keep the lot pretty much. I didn't like the first attempt although later I'll fire up the hotplate and try passively smoothing it (wax paper is totally non porous - so ACTIVE smoothing just tends to push the wax off areas of the paper).

ATTEMPT 2


Attempt two was less ambitiously coloured and less awful but still far from acceptable. And also boring. Thats another thing about landscapes ie I don't actually LIKE traditional landscapes much. It's kinda meh... I can see that wandering around outside in full, glorious, 3 dimensional technicolour why would I try and paint an inferior version?

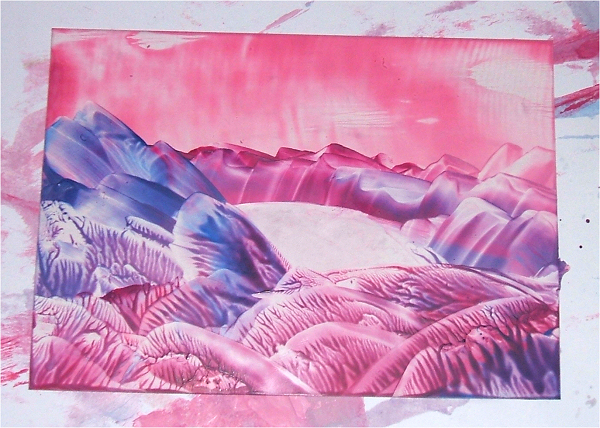
So the answer... go with something I do love. The fantastical. Time to break out the pink and purple paints.

It's all good. I'm learning. 1. Don't landscape in black paint. 2. Paint things you like. And 3. level of heat matters.

ATTEMPT 3


So... attempt 3. I felt marginally more in control. Still not happy but can see some improvement and this one had a better sense of dimension, I thought. More practise in the same vein required

ATTEMPT 4


Attempt 4. Now I actually feel like I'm progressing. Its generally much more pleasing and I've added some stylus detail in as well. Not brilliantly executed stylus work but it helps I think. I like the suggestion of being at the bank of a great river. I don't like the bottom right, it looks overworked. In fact looking at it again I'm not keen on the foreground in general. But I like the sky and the lake and the birds.

ATTEMPT 5


Attempt 5. Part of me thinks I'm regressing. This one has better definition and depth than the previous but qually it has less detail and just feels... like a step backwards. However it's 4.22am in the morning, I've been at this for 3 hours and that could just be a sign that I need to sleep.

Tomorrow - another few of tries at iron-only (more or less) landscaping, the addition of castles and if I get to a stage where I'm halfway satisfied, I'll move on to the hotplate.

Wednesday, 28 April 2010

52 Weeks

Is a project in the making.

OK, anyone who is even vaguely familiar with me is aware my attention span is... limited. That's why I haven't taken over the world yet ^_^. I get distracted too easily and while I would love to spend the next year mastering some art of craft form to it's absolute best, we all know it ain't gonna happen. Not because I doubt my ability to do so... but because I get very distracted very easily. And bored. Let's not forget my capacity for boredom.

Add to that the fact I've spent the last four months largely working 14+ hour days and I really sort of need an enforced break. A few weeks off work isn't practical so I'll opt for enforced mental break... which brings me back to the 52 weeks project rather neatly.

It's really rather simple. I own vast amounts of items for innumerable different arts and crafts. I mean seriously, I have a shopping habit and magpie-like powers of resistance when it comes to shiny Stuff. I own stuff in the regions of tens of thousands of £££ purely because I have days when I thought "wow, that looks cool". This is not exactly laudable but it DOES mean I canuse the resources at my disposal to tackle a different craft/art/product/theme every single week for a year. I don't want to be too limiting so I'm quite happy to go witha broad "Jewellery" one week, an area specific "Precious Metal Clay" another week or an item specific "something using stamps" another. There are rules. Rule one is a minimum of an hour a day (average over the course of a week... so expect lots of frantic Sundays). Rule 2 is a write up of the week by the evening of the Monday. Rule 3 is post pics, including of the design process!
Why? For fun, for motivation, to feel vaguely justified in my purchases, to develop new skills and to remind myself of exactly what I own, amongst others. And curiousity. What can I come up with given self imposed incentive?

So... for this to work, I need to come up with 52 weeks of Stuff. And I will stick to the order or I'll waste far too much time trying to decide what to do in a given week. Yes I have everything on this list (or the materials for) lying around my studio/workshop areas ^_^. You see my point?
1. Wax Landscapes
2. Friendly Plastic
3. Fabric Fusing
4. Acrylic Medium
5. Blow Torch
6. Stone Setting
7. Cardmaking
8. Fabric Paints
9. yarn
10. Aluminium
11. Embroidery thread
12. Stamps
13. Stencils
14. Acrylic Paints
15. Devopatch
16. Printable Fabric
17. Pastels
18. Polymer Clay
19. quilling
20. Embossing crystals
21. Dried Flowers
22. Moulds
23. Egg Shells
24. Napkin decoupage
25. Mask decorating
26. Buttons
27. Paper collage
28. Fabric sculpture
29. Quilting fabrics
30. Silk paper making
31. Machine embroidery
32. Bondaweb
33. Coloured pencils
34. Chinese fabrics
35. Sead beading
36. Fabric art collage
37. Wax collage
38. Epoxy resin
39. Opal cutting
40. Piercing
41. Precious metal clay
42. Paper sculpture
43. Novelty cards
44. Embellishment pendants
45. Abstract watercolour
46. Gemstones
47. Watercolour fairies
48. Wood sculpting
49. Textural fabric collage
50. Wire sculpting
51. Bookmaking
52. Wire Crochet

So... week one starts on Monday 3rd May (it makes sense for my final day to be a Sunday in a given week - that's when I'm most likely to be able to find time to catch up).

Stay tuned for week 1 - Wax Landscapes. I've chosen that as my starting point because I love wax and I'm pretty crap at landscaping with it. So a few hours of actually working at it rather than giving up and trying something else will probably be good for me :o)

Tuesday, 22 September 2009

From Concept to Completion: Making Jewellery


Ever wondered how jewellery designers come up with their ideas? What design factors are taken into account (and what commercial limitations there are in place)? Here I aim to give you an idea of my concept-to-product process.

A sunny afternoon in late July is not really the setting one might expect a winter jewellery collection to be conceptualised in but that’s exactly what I was doing this summer.

Sterling silver fairy necklaceJuly is the perfect time for me. Summer is slow on the jewellery components and beads side and I like to stocktake over the summer to ensure everything is ready for the September rush on jewellery making customers. So I close my online shops in late July, take everything I want to use to make jewellery and then frantically make as much as possible for a month before stocktaking and re-opening my shops in September. This lets me get a wide range of items designed and made before my manic sales of the final four months of the year start.

I was sitting outside one very clear morning in July and the clouds were like little fragmented puffs of ice. My ‘Winter Fantasy’ collection is based around those beautifully crisp, clear mornings in winter where the dawn lights up the entire sky in barely-there shades of pink, blue, lilac and lemon with dotted white clouds. Think the morning after snowfall when the sun is glinting off bright white snow and frozen icicles. The ‘Fantasy’ part comes from my love of the magical and whimsical. About half of my collection features unicorns, pegusi, fairies, stars, moons and the like.

Moving from the concept to actual jewellery is a careful process. First I look at the colours and pick out appropriate shades in Swarovski crystal and occasionally, glass beads. I’ve used a lot of crystal AB, light sapphire, aquamarine, light rose, rosewater opal and violet opal among others. Then I look at my Sterling silver components. I sell components in various finishes of silver from very dark antiqued to the bright, almost white silver of very highly polished findings. It was the latter which were incorporated into this range.

Next is design and make. It’s important to get a balance between artistry and retail savviness if you’re depending on sales for a living. I do make art pieces which take many, many hours, but when designing a retail collection there has to be a trade-off between time spent and rewards available (i.e. how much I can sell them for). So a lot of my retail collection are both beautifully simple and relatively quick to make which in turn allows me to keep prices at an affordable level.

Sterling Silver Purple BraceletI tend to design 2 or three pieces, sort out the quantities I will need to make duplicates and then make up multiples of them. Again, this is a simple matter of economic sense, particularly as all my jewellery is sold through my eBay store. eBay implemented changes for business sellers earlier this year which make selling multiple quantities of the same item far more cost effective and likely to succeed than selling individual items. So most items are made with between 3 and 10 pieces of the same item.


Sterling Silver Star EarringsMy jewellery ranges tend to centre around necklaces, bracelets and earrings and often I’ll make up matching ranges of necklace, bracelet and earring so a customer can buy a whole set if they wish. I make an average of 20 pieces a day for around 4 weeks. That’s over 500 pieces, all carefully hand crafted in my studio in South Gloucestershire, England.

My jewellery is available online exclusively through my ebay store at www.stores.ebay.co.uk/princess-jewellery. I also sell a large range of beads and findings, many of which went into my current collection, both through my ebay store and through my website at www.princess-jewellery.net.


Gallery

Sterling silver necklace with Swarovski Crystal
in shades of blue, green and teal
.

Blue Crystal Necklace


Sterling silver earrings with fairy drops and Swarovski
crystal hanging from delicate rose-shaped post earrings.


Sterling Silver Fairy Earrings

9 Carat yellow gold earrings with 9ct glitter beads
and aquamarine Swarovski crystal
.

Aquamarine Gold Earrings

Sterling silver charm bracelet with Swarovski Crystal beads,
glass lampwork beads and a beautiful fairy charm.


Sterling Silver Pink Fairy Charm Bracelet